Look and Feel
The look and feel of AndBible can be configured at several levels: for the entire application, as global defaults, for specific workspaces, for individual windows, or even for particular modules.
Text display settings hierarchy
Text display settings (formatting, fonts, colors, etc.) follow a three-level hierarchy. Each level inherits from the one above it, so you only need to change a setting at the level where you want it to differ.
- Global defaults – apply to all workspaces and windows everywhere.
- Workspace settings – override global defaults for one workspace and all its windows.
- Window settings – override the workspace setting for one specific window.
When you change a setting at a higher level, all lower levels that have not been explicitly overridden will automatically follow the change. For example, if you set the global font size to 16 pt and a workspace has no font size of its own, it uses 16 pt. If you then change the global font size to 14 pt, that workspace (and all its windows) will switch to 14 pt as well.
A setting that has been explicitly set at a lower level is called an override. Overrides are not affected by changes at higher levels. For example, if you set a workspace font size to 18 pt, changing the global font size will not affect that workspace. You can remove an override at any time to go back to inheriting from the parent level.
Visual indicators in the text options screens show where each setting comes from:
- ⚙ Settings gear icon – the setting is inherited from global defaults.
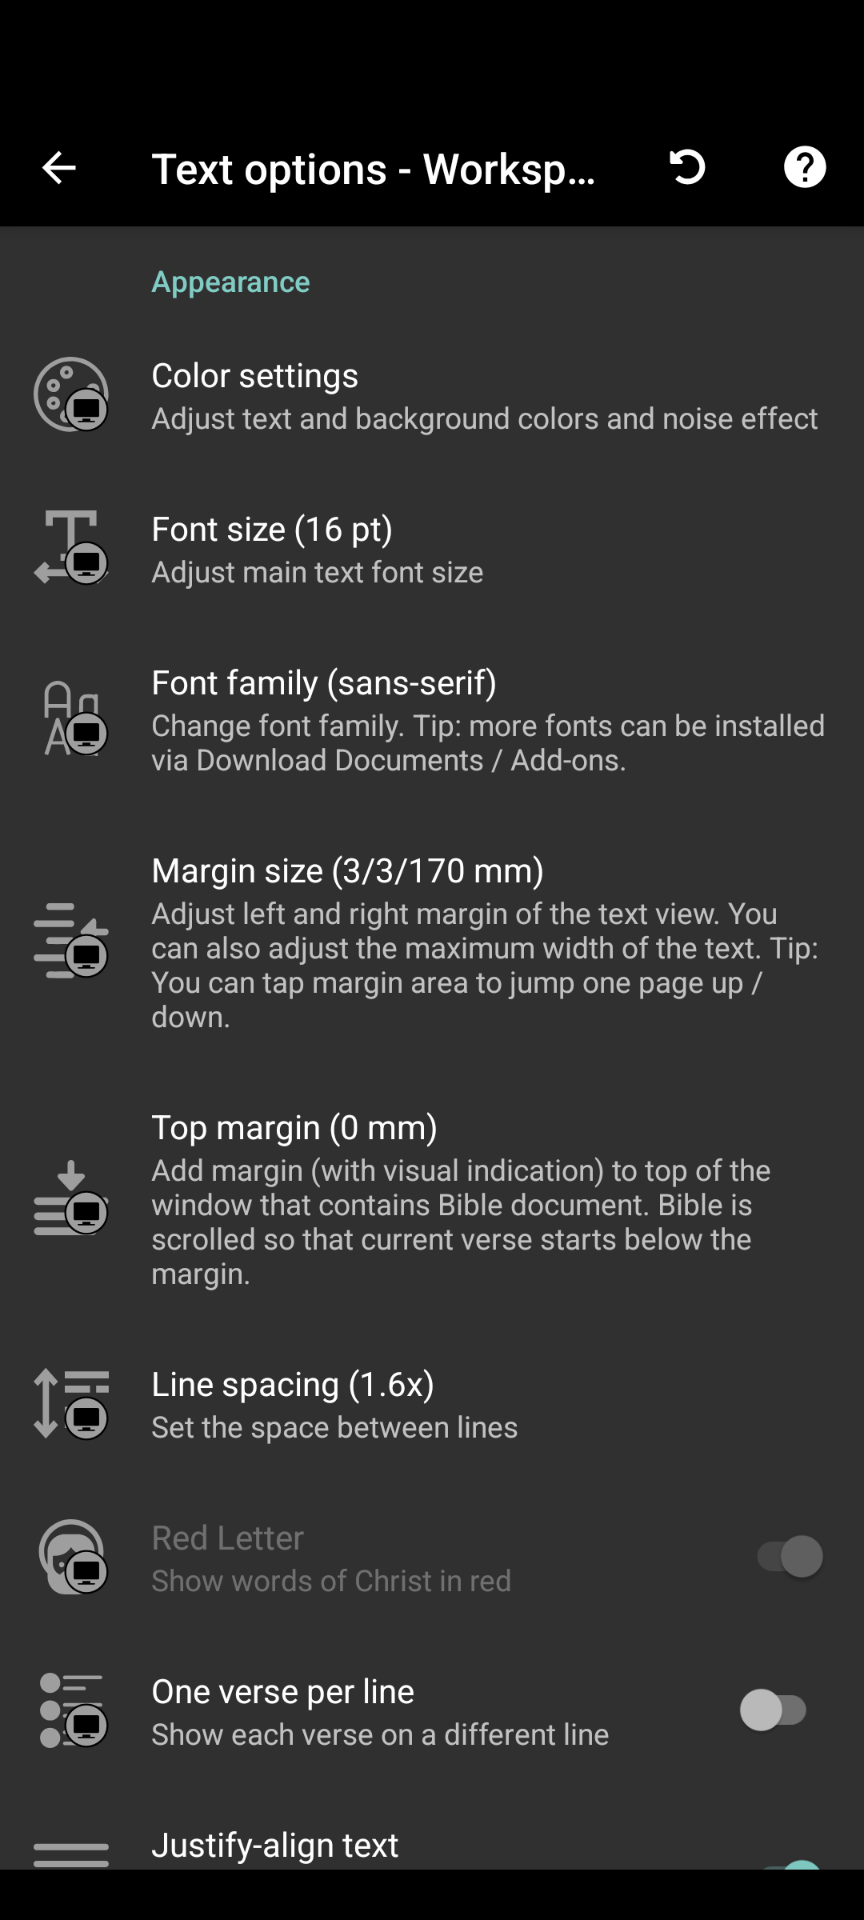
- ■ Gray workspace icon – you are editing a workspace default (affects all its windows).
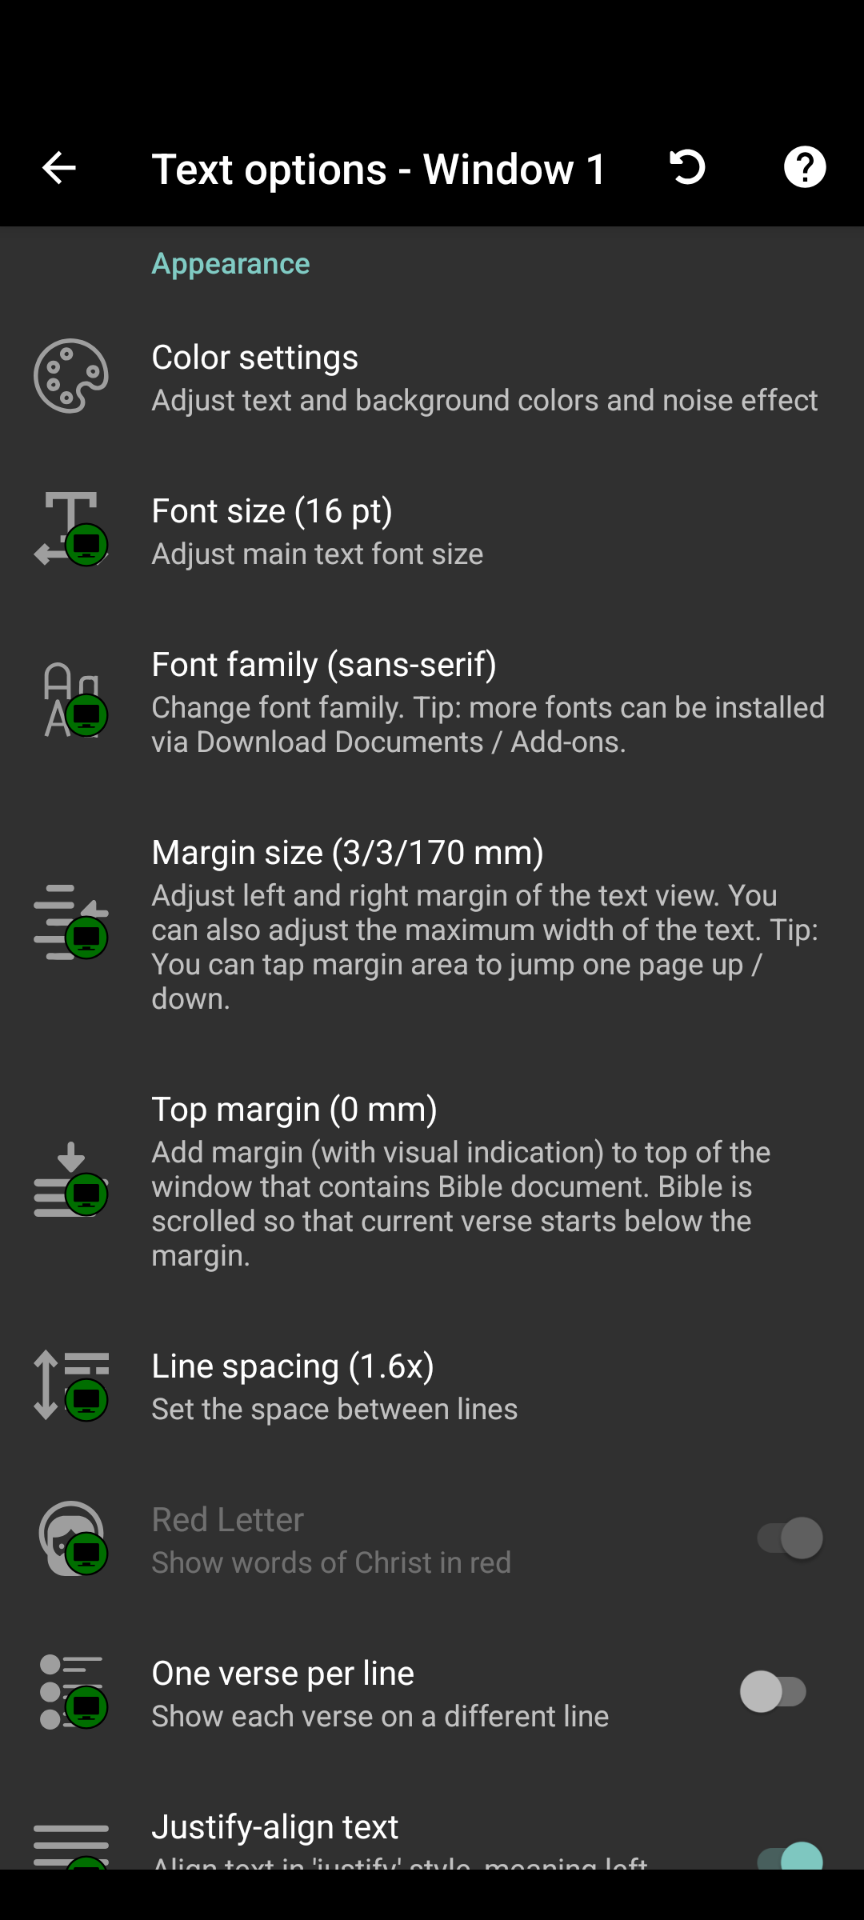
- □ Green workspace icon – the window setting is using the workspace default.
- No icon – the setting has been explicitly changed at this level (overrides the parent).
You can navigate between levels directly from the text options screen. At the window level, links to the workspace and global settings are shown at the top. At the workspace level, a link to the global settings is shown. This makes it easy to see and adjust settings at every level without leaving the settings screen.
Application settings
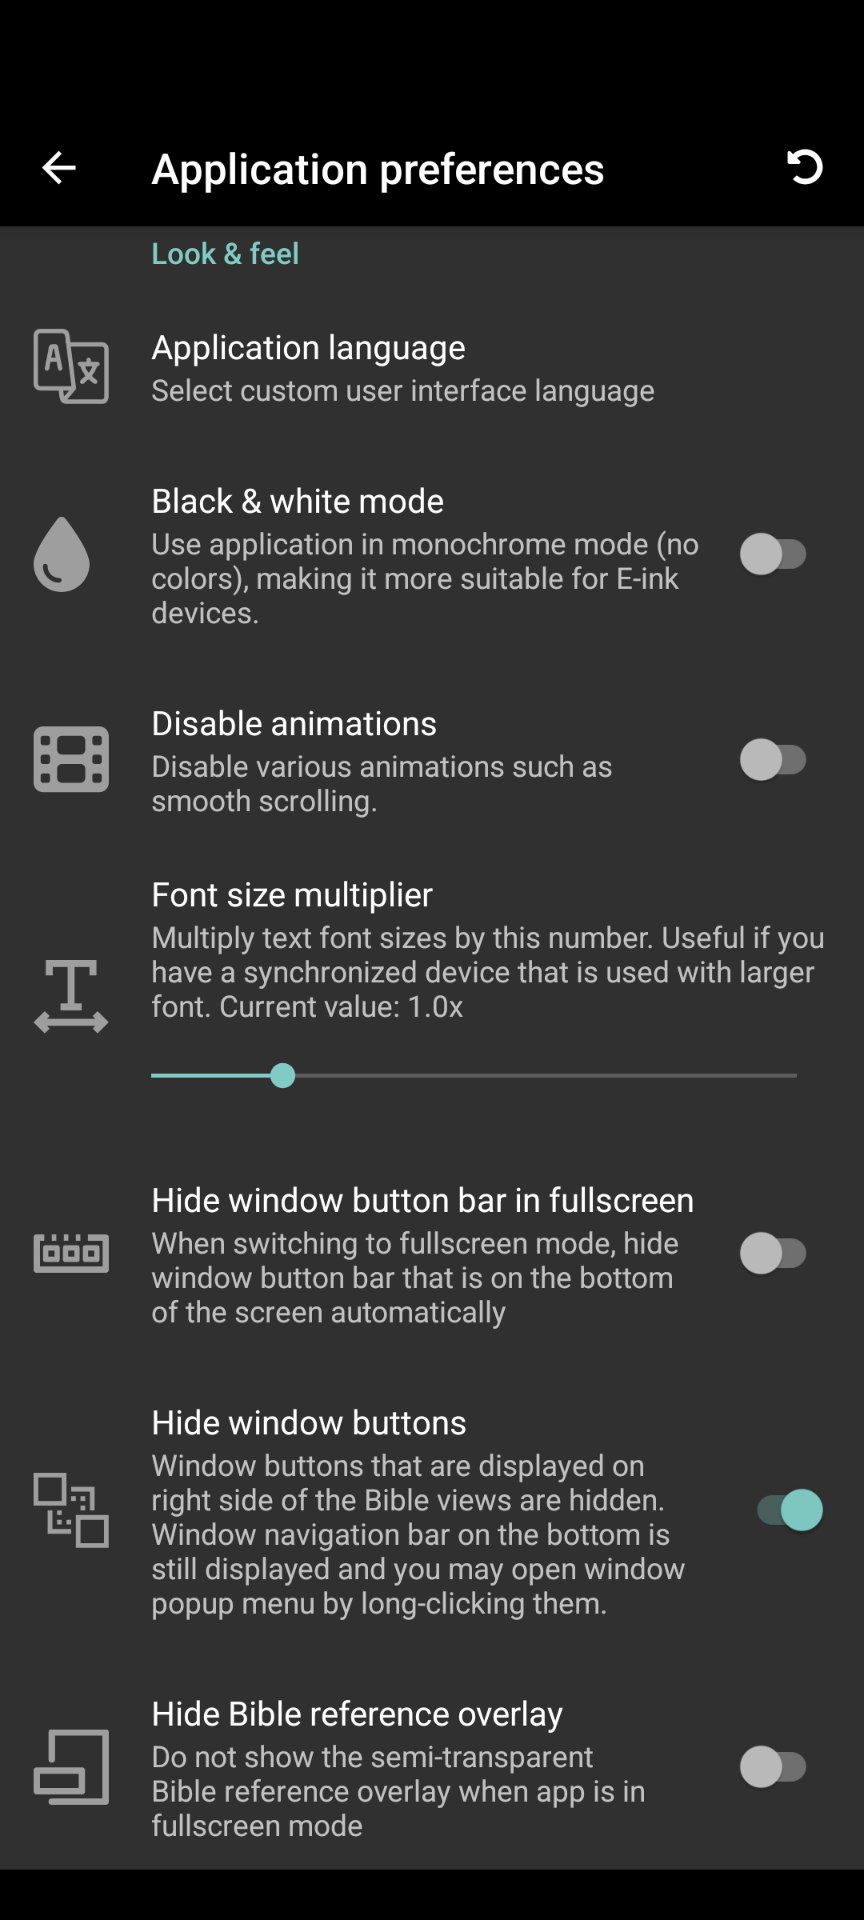
To configure application-wide settings (which are not synced to other devices),
navigate to the top left main menu (☰) and click Settings. These
settings apply to the local device only and are separate from the text display
settings hierarchy described above.
General
- Application language: Choose the language for the application interface (dialogs, menus, settings).
-
Night mode: Control when the dark theme is used:
- Manual (default) – toggle dark mode from the three-dot menu.
- Automatic – switch based on time of day.
- System – follow the Android system dark mode setting (Android 10+).
- Format for new bookmark notes: Choose whether new notes are created with the HTML editor or the Markdown editor. Existing notes keep the format they were created with.
E-Ink Displays
- Black & white mode: Reduces the use of colors throughout the application. Recommended for e-ink displays where color rendering is limited.
- Disable animations: Turns off smooth scrolling and transition animations. Improves responsiveness on e-ink screens and very old devices.
These two settings work well together for an optimal e-ink reading experience.
Font and Text
- Font size multiplier: A global scaling factor (10%–500%) applied to all document text. Useful when you synchronize workspaces across devices with different screen sizes – the workspace font size is synced, but the multiplier is per-device. For example, setting 150% on a small phone while leaving 100% on a tablet keeps text proportional.
Fullscreen and Window Display
- Hide window button bar in fullscreen: Hides the bottom window buttons when in fullscreen mode for a distraction-free view.
- Hide window buttons: Hides the menu buttons at the top right of each window. You can still access the window menu by long-pressing the buttons in the bottom window bar.
- Hide Bible reference overlay: Hides the semi-transparent Bible reference indicator that normally appears near the bottom of the screen in fullscreen mode.
- Show active window indicator: Highlights the corners of the active window with a colored border. Makes it easier to see which window is currently active when using multiple windows side by side.
One-Tap Actions
When you tap on a verse or text, a quick action bar appears. You can customize which buttons are shown in this bar:
- One-tap actions (Bibles): Configure which actions appear when tapping text in Bible documents. Available actions include: Bookmark, Bookmark with note, My Notes, Share, Compare, Speak, and Memorize.
- One-tap actions (Other documents): Configure which actions appear for non-Bible documents (commentaries, books, etc.). Available actions include: Bookmark, Bookmark with note, and Speak.
Study Pad
- Disable Study Pad click-to-edit: When enabled, notes in Study Pads can only be edited by tapping the edit button, not by clicking on the note text directly. This prevents accidental edits while reading.
Global text options
Global text options are the default text display settings for all workspaces. Any workspace or window that has not explicitly overridden a setting will use the global value.
To access global text options:
- From a workspace text options screen, tap the Global text options link at the top.
- From a window text options screen, tap the Global text options link at the top.
When you change a global setting, the change is immediately reflected in every workspace and window that is still inheriting that setting. Workspaces or windows that have their own override are not affected.
Global text options are synced across devices.
The available settings are the same as those described in the Formatting and Text Appearance sections below.
Workspace text options
To configure the look and feel of an individual workspace, click on the three
dot kebab menu on the top right of your workspace. From there click on
All Text Options.
Workspace text options override the global defaults for that workspace and all its windows. These settings are synced across devices.
Formatting
- Section titles: Show non-canonical section titles added by translators.
- Title scroll button: Show a small button next to section titles that scrolls to the top of the section when tapped.
- Verse numbers: Show or hide chapter and verse numbers.
- Footnotes: Show footnotes if available in the document. Optionally display them inline rather than in a popup.
- Cross references: Show cross-reference markers. Optionally expand them inline to see referenced text directly.
- Strong’s numbers: Show links to Greek and Hebrew dictionary definitions.
- Morphological codes: Show Robinson’s Greek morphology codes.
- Italicize added words: Italicize words that do not have Strong’s numbers associated with them. Useful for translations like KJV where added words are traditionally shown in italics.
- Infinite scroll: Automatically load more content when you scroll to the end of a chapter.
Text Appearance
- Colors: Adjust text color, background color, and background noise (a subtle texture overlay on the background).
- Font size: Set the base text size in points.
- Font family: Change the typeface. Additional fonts can be installed via font add-on modules.
- Margin size: Set the left and right margins independently, measured in millimeters. You can also set a maximum text width to prevent lines from becoming too long on wide screens.
- Top margin: Add a margin at the top of the window (in millimeters). The reading position starts below this margin.
- Line spacing: Adjust the space between lines (multiplier from 1.0x to 2.0x).
- Paragraph spacing: Adjust the space between paragraphs (in millimeters).
- Red letter: Show the words of Christ in red.
- One verse per line: Display each verse on a separate line.
- Justify text: Align text to both left and right margins.
- Hyphenation: Automatically hyphenate words at line breaks (if supported by the language).
- Relative page number: Show a page number overlay indicating your position relative to where you started reading.
Window text options
When using multiple windows, you can customize the text options of each individual window to override the workspace settings. To change window text options:
- Tap and hold the square window icon at the bottom for the window you would like to customize.
- Click
Text Options, then clickAll Text Options.
All of the same options that you could configure at the workspace level can be overridden for the selected window. In the screenshot below you can see that the window color settings are overriding the workspace color settings (indicated by the missing workspace icon). To reset all window settings back to the workspace defaults, you can click the circular back arrow at the top right of the window settings screen.
From the window text options screen you can also navigate directly to the workspace or global text options using the links at the top of the screen.
Module
For things that can not be changed through global, workspace, or window settings, like the color of certain text within a module, e.g. Headings or Strong’s numbers, you can code the color in the style.css file located within the module’s zip package. You can see some examples of this being implemented here:
For more details on how to create custom CSS modules, see Custom CSS and placement of this file, it should be located in the modules/texts/ztext/hisb/style directory.
Once the customized module is coded, you can follow the steps in Backup and Restore to load your customized module.